iphone focus automation via home assistant
I had a simple goal: Make my iPhone go into Sleep focus via some automation in Home Assistant.
TL;DR: Using Node-Red and an always-on MacBook, I automated my focus state.
My use case was an Arre Smart Button on my bedside table that I clicked to activate my “good night” routine: turn off the lights, set the thermostat, and (ideally) set my phone to Sleep focus so that notifications wouldn’t make sounds.
That last bit proved to be a lot harder than I expected. The only way from my iPhone to turn on the Sleep focus without relying on time-based automation was to use the built-in Shortcuts app. What I needed was an automation trigger that could be invoked from another server. Here were all of the automation triggers that Apple had implemented:
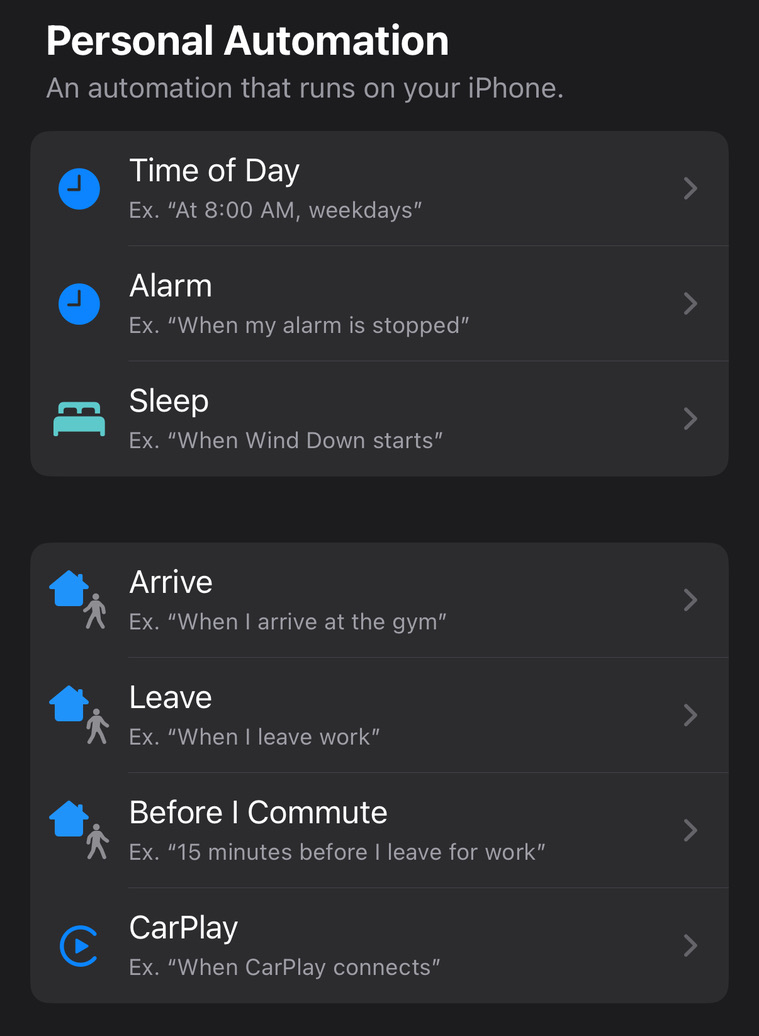
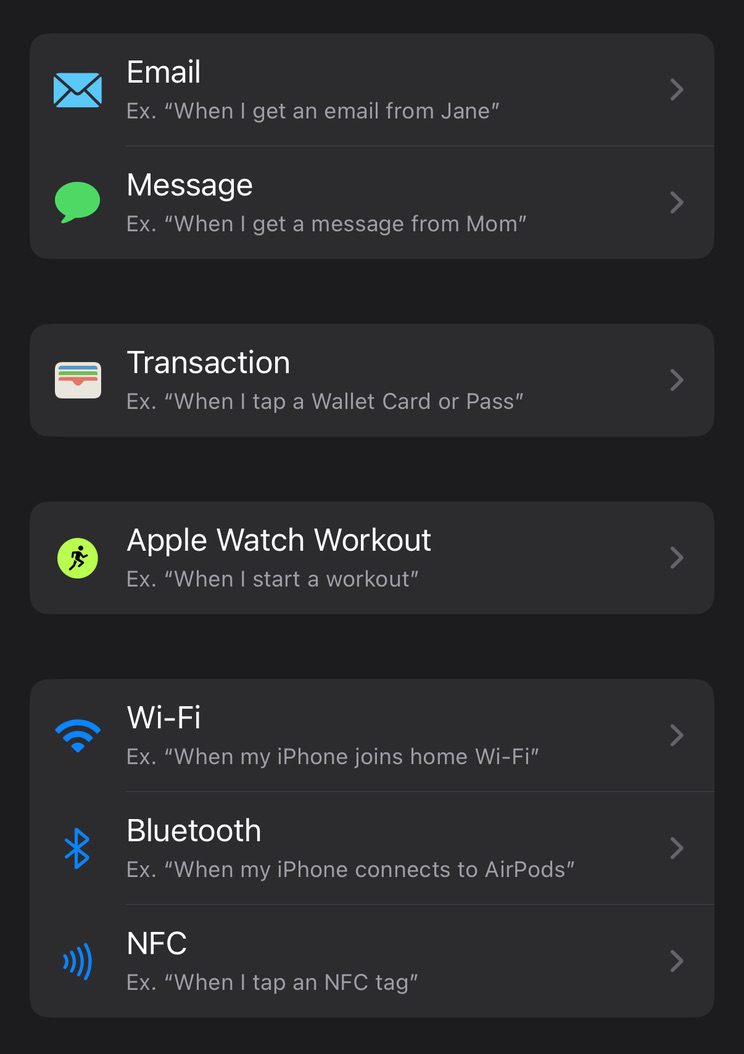

Right away, the only triggers that I could see being useful here were Email and Message. If I could have had Home Assistant either email or text my phone, that should have been enough to trigger my shortcut and turn on my Sleep focus…right?
Attempt 1: Email
My main concern with this idea was that emails on my iPhone had never arrived quickly. If an app sent me a 6-digit code to sign in, for example, I always had to go into my Mail app and force a refresh before I got the email. Otherwise, I’d be sitting there for 5-15 minutes before I got the email.
The primary reason for slow mail was that only iCloud email accounts supported “Push” notifications in the Mail app; all others had to “Fetch” the mail every 15+ minutes. This was why my Gmail messages took forever to come in. From the little research I’d done, it sounded like Google did not support Push notifications on third-party apps, and instead only allowed it on their own Gmail app. Lame…
So, to make this work, I needed to send an email to my iCloud address. That should get it to my iPhone the fastest. To test this idea, I set up an automation to listen for emails on my iCloud address, and turn on Sleep focus when one arrived. Then, I sent an email to my iCloud address from my Gmail address.
Sadly, the emails did not always come in quickly. Many times, I let my iPhone sit still and it took over 5 minutes before the email showed up (battery saver was disabled, btw). It showed up immediately on my MacBook, though. There were a few rare cases where the iPhone did show the email within about 10 seconds, but I’d really like something faster than that.
Even still, if the emails did come in immediately, it wouldn’t matter. The automation just straight up didn’t work, at least on my phone. It just didn’t run at all. I double and triple-checked that everything was correctly configured, but it would never even try to run the automation. I found a thread on Reddit where people were complaining of this happening for iCloud accounts. I had to assume it was just an iOS 18 bug.
Moving on to my next idea… Messages?
Attempt 2: SMS Messaging via Email
So I couldn’t detect an email. Maybe I could detect an SMS? To send SMS messages to my phone, I would likely need to pay per message with a service like Twilio. It’s not a ton of money ($0.0079 per message – about 50 cents per month for two messages per day), but it’s more the principle of it that hurt me. We live in an era where there are better, faster, and completely free options for push-notifying a cell phone than with SMS messages. Yet, here we are …
First, though, I wanted to try a trick that I’d messed with in the past. It’s a little bit hacky, though. Did you know you could email a phone number? For example, with a T-Mobile number, you could send an email to e.g. [email protected] and it would arrive as a text message to (123) 456-7890. Verizon and some other carriers have killed this antiquated feature, but mine still supported it so I thought I’d at least try it.
This kinda worked. The first few messages came through. It was a little slow, around 5 seconds, but it did work. However, it quickly stopped working. The email server started to immediately send back messages saying that the email was blocked. It seemed like they had some very aggressive spam filtering and were able to detect automated messages like “Goodnight!”. Maybe I could find a way around this, but frankly, I was in search of a more reliable solution, and this felt gross. Plus, it was probably against their TOS to automate such a thing, and I’d like to keep my phone number alive.
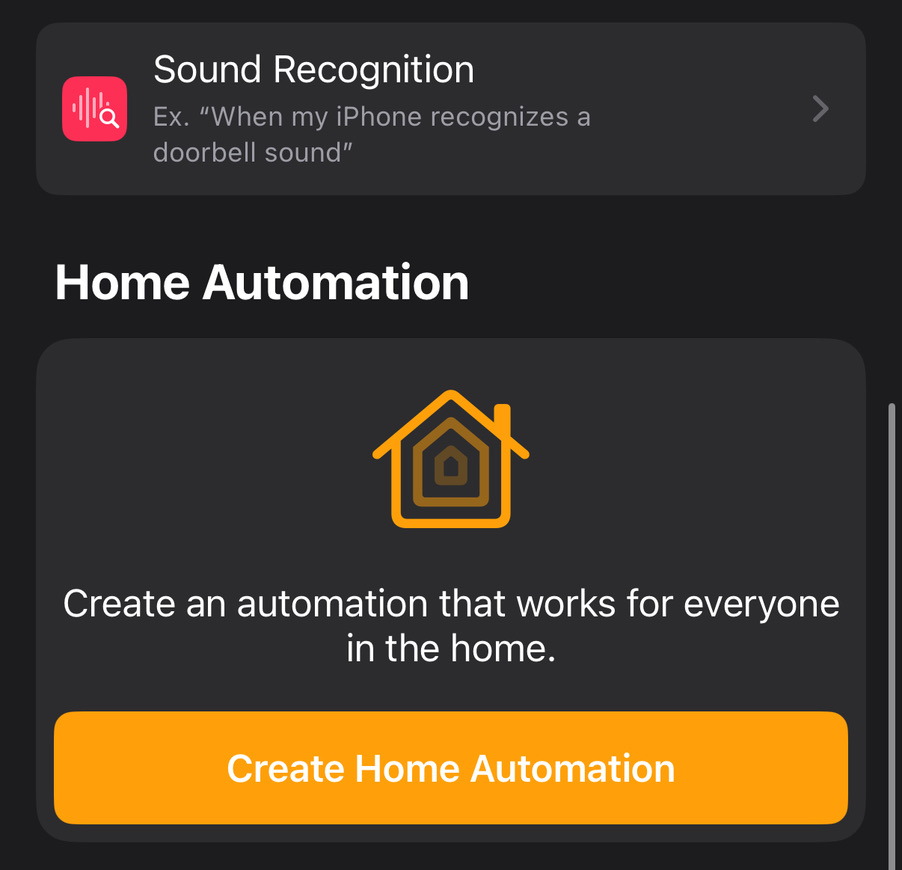
Attempt 3: Apple Home Automation
While playing with the previous two ideas, I remembered that I could create automations in Apple Home. You could do things like turning on a light when a sensor detected too much CO2 in the air, or whatever. I had my Home Assistant and Apple Home services connected, so I could expose devices in Home Assistant into my Apple Home. Maybe I could use this to accomplish my goal?
I was able to create a virtual “switch” in Home Assistant that represented whether I was sleeping or not. I put this into Apple Home, and began creating an automation on it.
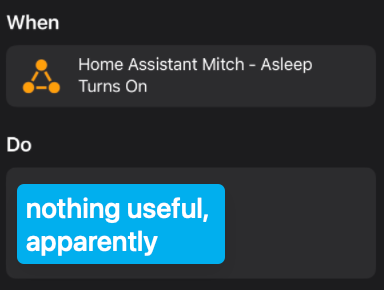
…but, it was pretty useless. You couldn’t set a focus. You couldn’t run another shortcut. You couldn’t really do anything that involved changing the iPhone. I can only guess that this automation would run on a remote server somewhere, perhaps even on my Apple TV (which tended to serve as a HomeKit hub), and therefore would have no direct access to any of the iPhone features. Lame!
Attempt 4: SMS Messaging via Twilio
Ok, fine. Maybe I’d pay the 50 cents per month to solve this minor annoyance.
I rented a “Local” phone number on Twilio (another $1.15 per month already) and installed the Twilio integration on Home Assistant. Then I added a notify section to my configuration.yml as such (docs for this are here)…
# Example configuration.yaml entry
notify:
  - name: send_sms
    platform: twilio_sms
    from_number: "+12223334444" # Twilio number goes here
I rebooted Home Assistant and sent my SMS with the following action:
action: notify.send_sms
data:
  message: Good Night!
  target: 19998887777 # Personal number goes here
and!!! nothing happened. I had to check the Twilio error logs and saw this:
Messages sent to US numbers will not be delivered if they are sent from numbers that are not associated with an approved A2P 10DLC Campaign
??? wat? This turned out to be some new regulation I never had to do in the past, so it caught me off-guard. After some research, I learned that it was a way to cut down on spam. I had to register with “The Campaign Registry (TCR)” as a sole proprietor, then tell them what I planned to do with the number, who I was messaging, etc… And I had to pay $2/month to maintain my registration. So this project was now coming out to about $0.50 for messages, $2 for the registration, and $1.15 for the phone number, for a total of $3.65/month. All so that I could have my iPhone go into sleep mode?? ☠️
If I instead got a “Toll Free” number for $2.15/month, there was a simpler registration process with no additional monthly fee, so it was more like $2.65/month for this project instead. So I tried that. But they wanted a legal entity name, which I did not have. I was just a person try’na get my phone to change focus!! I ain’t no company…
I did end up submitting a registration request to the TCR, but honestly, I gave up at this point. It should not be this hard or costly to just change my iPhone’s focus mode.
Attempt 5 (Successful!): MacBook, Node-Red, and iCloud Focus Sync
While researching this problem online, I came across someone who used Node-Red on a MacBook to set their MacBook focus mode, which would then sync via iCloud as it normally would and set the focus on the iPhone, Apple Watch, etc.
That’s what I ended up doing, and after some trial and error, I made it work.
First, I installed Node-Red on my MacBook using these instructions, which I will summarize here for posterity:
- Install via NPM:
sudo npm install -g --unsafe-perm node-red - Test it out; restart your shell and run
node-red. - Go to http://127.0.0.1:1880/ and it should be running.
Then I set up Home Assistant to expose my sleep state to MQTT. I had a boolean helper which I turned “on” when my focus should be “Sleep”, and “off” when it should be whatever else. With MQTT set up already for other purposes, I just had to add this section to my config:
mqtt_statestream:
  base_topic: homeassistant
  include:
    entities:
      - input_boolean.mitch_asleep
Then I could view the state at homeassistant/input_boolean/mitch_asleep/state, which would be either on or off.
Here’s what my Node-Red flow ended up looking like:
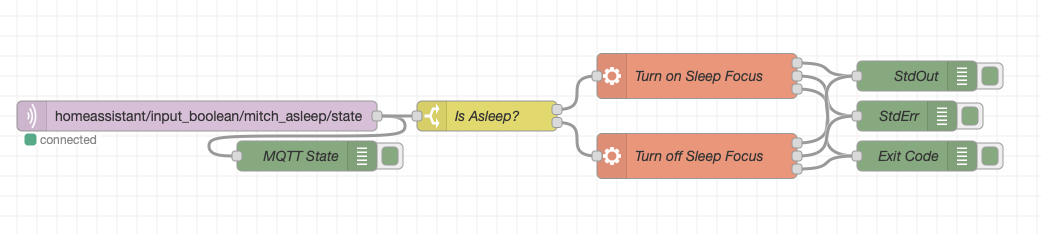
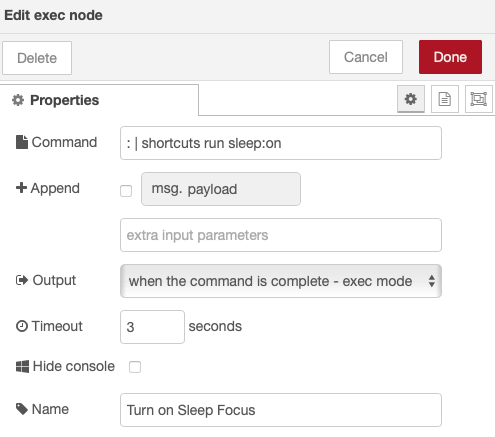
Basically, when the input value changed on MQTT, it would exec either shortcuts run sleep:on or shortcuts run sleep:off. However, there was a gotcha that really stumped me for a while. The Node-Red exec action was getting stuck for no apparent reason. It turned out that despite my shortcut not calling for any input, the shortcuts command was expecting something from stdin. I ended up changing the command to : | shortcuts run sleep:on, which effectively sent nothing to the command’s stdin, and it worked!
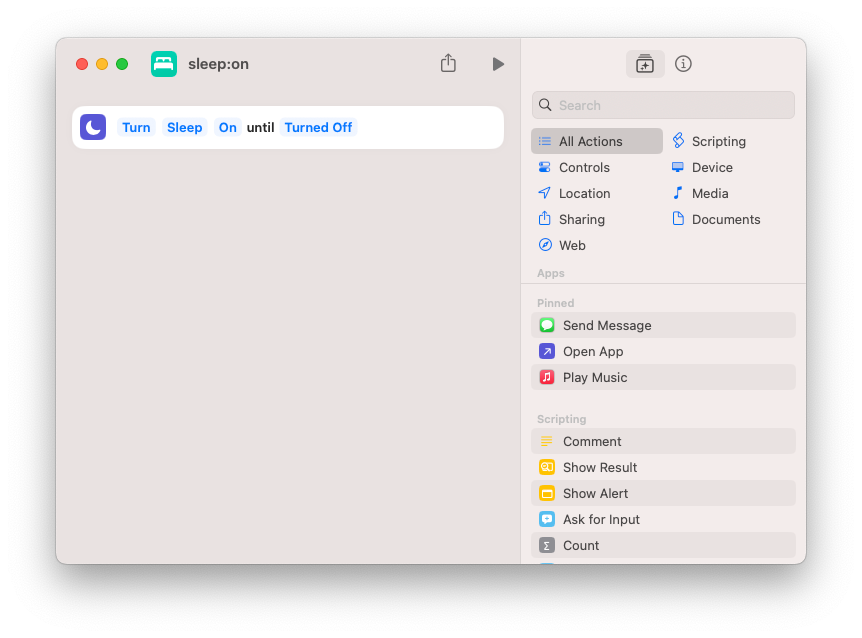
For the shortcuts, I used the macOS Shortcuts app to create a new shortcut that set my focus to “Sleep”, like so:
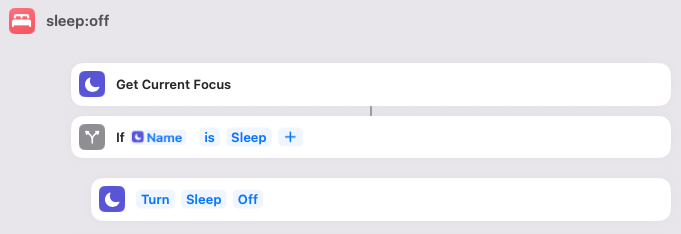
For the sleep:off shortcut, I added a check to make sure the focus was currently on, because I think Node-Red would run this shortcut at random times during the day and it would wipe whatever focus my phone was currently in (my guess is that the wifi renegotiating would act like an MQTT state change).
And it all worked! When I turned my sleep state on in Home Assistant, my MacBook ran the shortcut and my iPhone went into Sleep focus. It wasn’t instant, but it was pretty quick (around 5 seconds).
Keeping Node-Red Running
The only problem now was that to run Node-Red, I had to keep a terminal open. Also, when my MacBook went to sleep, it stopped running Node-Red. Here is how I fixed it.
so…yeah! It wasn’t a very simple solution to my problem, but at least it worked, didn’t really cost anything extra, and it gave me the option to create other useful automations in the future now that I had Node-Red running.